Wednesday, October 19, 2011

Turkey & White Bean Chili

Happy Fall!!  We've been teased a few times with cooler temps, only to have the upper 90-degree weather come barreling back 24 hours later.  This week, though, I've embraced fall.  The second I saw our weather report, I started thinking about soups...and stews...and chilis.  I love fall - the cooler temperatures, October baseball (well...sometimes), football season.  I love the holidays and celebrating with friends and family.  But I really, really, love the fall food.

When I saw this recipe, it moved right to the top of the list.  I usually like my chili the way my parents always made it.  I don't really have a recipe, I just know how it should taste.  I've tried chicken chili before, but it just wasn't right.  But this recipe had potential!  I did adjust it a bit, adding some extra broth to thin it out and pouring in a can of diced tomatoes because, well, chili isn't chili for me without tomatoes.  Next time I may throw in a jalapeno for a little extra kick, but overall this is a keeper.  That's saying a lot considering I usually don't want beans anywhere close to my chili!


Turkey & White Bean Chili adapted from Skinny Taste
  • 2 pounds ground turkey
  • salt & pepper
  • 1 onion, diced
  • 2-3 cloves of garlic, minced
  • 1-2 tsp chili powder, I went with a little more
  • 2 tsp cumin
  • 1 tsp oregano
  • 2 bay leaves
  • 2 cans white northern beans, drained & rinsed
  • 32 oz chicken broth, low sodium
  • 15 oz can pumpkin puree
  • 4.5 oz can diced green chilis
  • 14.5 oz can diced tomatoes
Heat a small amount of olive oil in a large skillet over medium-high heat.  Brown the turkey until done, season to taste with salt & pepper and add to a crock pot.  Using the same skillet, saute the onions for about 4-5 minutes, or until they start to brown.  Add in the garlic and saute for an additional minute.  Add the onions & garlic to the crock pot.  Add the remaining ingredients and cook on low for 6-8 hours or on high for 3-4 hours.

Serve with diced green onion, sour cream, chips...or whatever you usually like with your chili!  Tomorrow night, we're having the leftovers with a little rice.

Thursday, October 6, 2011

Green Bean & Tomato Salad

We had a crazy hot summer this year.  Like 100* for a very long time.  Most of our meals consisted of something that could either be cooked in the crock pot, on the grill, or not at all.  I'd like to say that the weeks of grilled meat & salad meals helped me lose weight...but I'd be lying.  I think it had to do with the ice cold beers that were consumed to help keep us cool.

I think I also developed a new love for fresh green beans.  I've always been a fan of green beans, although we don't eat them often since Cooper won't even look at them.  During the fall I love to steam them and toss with a little bit of bacon or lemon zest.  But summer, especially a hot summer, begs for them to be served in a cold salad.  I added a little bit of pasta to this salad to beef it up a bit, and so that I could cook a little extra pasta for Cooper.  The dressing was very easy to make and I was a fan - although it did break the "no oven during the summer" rule.


Green Bean & Tomato Salad with Roasted Tomato Dressing from Cooking Light

  • 1 large ripe tomato, halved
  • 1 tablespoon chopped basil
  • 1 tablespoon olive oil
  • 2 teaspoons red wine vinegar
  • 1/2 teaspoon sugar
  • 1/2 t Worcestershire sauce
  • salt
  • pepper
  • 1/2 lb fresh green beans, trimmed
  • Romaine lettuce, torn
  • 1 cup cherry tomatoes, halved
  • 1 1/2 cups cooked bow-tie pasta
Heat the broiler.  Place the tomato halves on a baking sheet sprayed with cooking spray and broil for about 10 minutes, or until blackened.  Let the tomato cool for about 10, peel and core discarding the peel & seeds. Combine the tomato, basil and next 6 ingredients in a blender and blend until smooth.  

Cook pasta according to directions on the package in salted boiling water.  Drain and rinse with cold water.  Steam the green beans until tender, about 7 minutes.  Rinse with cold water, drain.  Combine the Romaine, tomatoes, pasta & green beans in a large bowl.  Serve dressing over each salad.

Monday, September 12, 2011

Creamy Two Cheese Linguine

I haven't fully subscribed to the whole "Meatless Monday" thing.  It's a good idea in theory, but what if my week gets wonky and I need to move my menu around?  Or what if I just want a hamburger on a Monday?

Truth is, I grew up thinking that meals had to include a meat, vegetable and a starch.  Daily.  I'm not talking deep South fried chicken, butter beans & mashed potatoes, but it is a hard habit to break.  My family owned a meat processing plant, so going vegetarian wasn't exactly good for the bank account.  These days, I like the idea of a meal that can be thrown together quickly - and the easiest ones don't include meat.  Plus, some days I may or may not indulge at lunch and having a lighter dinner just fits.

I decided on this dish because I had some Asiago cheese that I wanted to use.  I also had some spinach that we were not going to eat before the weekend, so I stirred that in.  But the best part was that Cooper even liked this dish, so that moves it up pretty high on the list these days.
 

Creamy Two Cheese Linguine from The Novice Chef
  • 8oz linguine
  • 1 cup skim milk
  • 3 tablespoons fresh basil, chopped & divided
  • 1 teaspoon salt
  • 1 teaspoon black pepper
  • 1 tablespoon extra virgin olive oil
  • 1 tablespoon flour
  • 2oz shaved Asiago cheese, divided
  • 2oz fat free cream cheese, at room temp
  • 2 cups fresh baby spinach leaves
Cook the pasta in salted boiling water, according to the package.  While the pasta cooks, heat a saucepan over medium-high heat.  Pour the olive oil into the pan, turning to coat.  Add in the flour and whisk constantly, for about 3-4 minutes or until the mixture begins to brown.  Whisk in the milk, 2 tablespoons of basil and salt & pepper.  Continue stirring until the mixture begins to thicken, about 4-5 minutes.  Add in 1 1/2 oz of Asiago cheese & the cream cheese, stir until the cheese melts.  Reduce heat to low and set aside until the pasta cooks.

Once the pasta is cooked to al dente, drain and add in the spinach.  Stir for 2-3 minutes, until the spinach wilts.  Combine the pasta & sauce in a large bowl, tossing well to coat the pasta.  Serve garnished with the remaining cheese and basil. 

Thursday, September 8, 2011

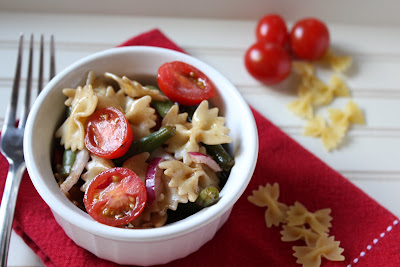
Green Bean & Tomato Pasta Salad

We've had a hot summer this year.  A really long, really hot summer.  I've tried to avoid using the oven at all costs to keep the house from turning into my own personal oven.  Thankfully, we started the summer with a new grill and a freezer full of beef, so this wasn't difficult.  We've spent quite a few weekends with steaks on the grill and some sort of salad on the side.

This recipe is one I've hung on to for quite some time, never having thrown it together.  I knew Cooper would like it, though, since he frequently consumes a pint of grape tomatoes on his own each week.  I try to tell myself it is ok because it is kind of a vegetable.  But it isn't.  And he can totally tell the difference in tomatoes - try anything other than a grape or cherry tomato and he'll refuse.  Kids are funny that way.

In hindsight, the only change I would have made would have been to add some crumbled feta cheese to this.  It was great, but cheese makes everything better.  Plus, the bite from the feta would have added another depth to the dish.  It will definitely be made again, though, with the cheese!


Green Bean & Tomato Pasta Salad from Southern Living
For the salad:
  • 8oz bow tie pasta
  • 1/2 lb fresh green beans, trimmed and cut into 1 1/2 inch pieces
  • 1 cup grape tomatoes, halved
  • 1/4 cup chopped red onion
  • 1/2 cup Basil Garlic Vinaigrette
For the vinaigrette
  • 1 garlic clove
  • 1/2 teaspoon salt
  • 1/2 cup extra virgin olive oil
  • 1/3 cup balsamic vinegar
  • 2 tablespoons chopped basil
  • 1/2 teaspoon fresh ground pepper
In a large Dutch oven, bring salted water to boil and add the pasta.  Cook for 5 minutes and add the green beans.  Cook for an additional 5-6 minutes, drain and rinse with cold water.

Smash the garlic and salt together to make a paste.  Whisk with the remaining ingredients until well blended.

In a large bowl, combine the pasta, green beans, tomatoes & onion.  Toss with 1/2 cup of the vinaigrette.  Serve chilled.

Monday, August 29, 2011

Parmesan Crusted Pork Chops

Remember Shake & Bake?  Not the catch phrase from that movie, but the actual cooking stuff?  I'll admit it - I've shake & baked before.  I was in college, ok.  And quite broke for a while after college.  Now I realize that making your own stuff (like shake & bake) is so much better for you and can cost less in the long run.

Even though this didn't call for a box of breadcrumbs & herbs, and a plastic bag, this was very easy to throw together.  I knew that it would taste great - fresh herbs with just a touch of Parmesan cheese.  What I didn't count on was the pork staying so moist.  I'm certain the mustard coating helped with that and I'm itching to try it out on baked chicken as well.  I typically cook a package of chicken tenders on the grill each week for lunch, but I think this will be a fun variation and will still taste great on a bed of spinach.

I did change this up a bit to use what I had in the house.  I only had about a cup of fresh breadcrumbs left, that I'd mixed with Italian herbs.  To make up the rest of the breading, I added Panko breadcrumbs.  I really think the Panko gave it an extra crunch.


Parmesan & Herb Crusted Pork Chops adapted from Rachel Ray

  • 1 cup fresh Italian style breadcrumbs
  • 1/2 cup Panko breadcrumbs
  • 2 tablespoons grated Parmesan cheese
  • 1/4 cup chopped parsley
  • salt & pepper
  • 3 tablespoons Dijon mustard
  • 4 1" thick boneless pork chops
Preheat the oven to 425.  Place a greased rack on a baking sheet.  In a shallow dish, mix the breadcrumbs, cheese, parsley and salt & pepper.  Brush the pork with the mustard and coat in the breadcrumbs.  Bake on the greased rack for 20-25 minutes.

Saturday, August 27, 2011

Dessert for a Year: Oreo Cheesecake Cupcakes

Earlier this month we went to visit my mom for her birthday.  Since we didn't plan on going out for dinner, I wanted to make a dessert for the house.  I knew I wanted to do something with Oreo cookies, since they happen to be my mom's favorite cookie.  I'd saved a few blog posts and ran them past Jason for his suggestion.  As soon as I mentioned these, he was sold.

Thankfully, by mistake, I ended up halving the recipe.  I read the ingredient list, thinking it called for two packages of cream cheese...not two pounds.  It ended up being a good thing.  These were so creamy and rich, that I'm afraid we would have eaten all thirty in one weekend.  For the sake of my waistline, we left them at my mom's house...although Jason has already asked for them again!


Oreo Cheesecake Cupcakes from Pink Parsley
  • 21 Oreo cookies
  • 1 lb cream cheese, softened
  • 1/2 cup sugar
  • 1/2 teaspoon vanilla extract
  • 2 large eggs, slightly beaten
  • 1/2 cup Greek Yogurt
  • pinch of salt
Preheat the oven to 275 degrees.  Line muffin tins with 15 paper liners, placing an Oreo cooking in the bottom of each one.  Crush the remaining Oreos, set aside.

Beat the cream cheese until smooth, scraping down the sides of the bowl as needed.  Gradually beat in the sugar until combined.  Beat in the vanilla, then drizzle in the eggs, beating until combined.  Mix in the Greek Yogurt and salt.  Stir in the crush cookies.

Spoon the batter into each lined muffin tin.  Bake for about 20 to 22 minutes, rotating the pan halfway through.  Cool in the pans on a wire rack, then transfer to the refrigerator to cool completely for at least 4 hours.

Friday, August 26, 2011

Grilled Romaine with Buttermilk Dressing

A few weeks ago I got a text from my friend Rachel.  It was something like "they are grilling lettuce on Food Network."  I think I responded with "I've had that...it is pretty good."  While she sent back "Ew.  Something about warm lettuce..."

I get it.  I love a salad.  But put lettuce on my sandwich or hamburger and I probably will just pass all together.  And if it is shredded lettuce, forget it.  At least the large leafs are easy to remove!  But I have had grilled lettuce.  I remember the first attempt - one of my previous jobs.  The chef thought it would be a great idea to serve a Grilled Caesar Salad.  Only we were serving 600 people, and well, that stuff needs to be served right away.  When moved to a "twenty-person only" menu and served fresh, the lettuce is a little warm, slightly charred, and takes on the smoky grill flavor.  Pair with cold, creamy buttermilk dressing and the contrast makes for a great salad.

The first night I made this, I chopped up tomatoes and threw them on top.  But something wasn't right.  The next evening I decided to roast the tomatoes with some garlic & olive oil until they burst, adding something a little more to the salad.  Holy cow...I see us buying a lot more Romaine in the future and firing up the grill.  Plus, Jason and I both hate chopping up the lettuce for salad.  That would be why it usually goes bad before we eat it.  This makes prep super fast and we're both happy with that.


Grilled Romaine with Buttermilk Dressing adapted from Southern Living

  • 2 hearts of Romaine, halved
  • olive oil
  • salt & pepper
  • 1/2 pint grape tomatoes
  • 1 garlic clove, minced
  • shredded Parmesan cheese
Heat about 1 tablespoon of olive oil in a small skillet over medium heat.  Add in grape tomatoes, crushed garlic and salt & pepper to taste.  Heat through, stirring occasionally, until the tomatoes wilt or burst.  

Heat the grill to a medium-high heat.  Brush the Romaine halves with olive oil and sprinkle with salt and pepper.  Grill, cut side down, for about 2 to 3 minutes, or until wilted.  Remove from the grill, top with tomatoes, dressing and Parmesan cheese.  This is best served just after grilling.

Buttermilk Chive Dressing
  • 3/4 cup buttermilk (I make mine with skim milk)
  • 1/2 cup light mayo
  • 2 tablespoons chopped chives
  • 1 tablespoon chopped green onion
  • salt & pepper to taste.
Whisk together all of the ingredients; cover and chill until needed.

Thursday, August 25, 2011

Pimento Mac & Cheese

I have been hanging on to this recipe for ages.  Like maybe 3 years?  I kept it because I wanted something easy and at the time, I was still looking for the perfect mac & cheese recipe.  Since then, I've realized that I don't think I can commit to one mac & cheese.  But that's ok.  Cooper is a fan of pasta and cheese, so I think he'll help me try a few more.

This did turn out to be a pretty easy recipe, so I think it will turn up on the menu again.  I really like having an option that doesn't have to be baked off in the oven, especially for a weeknight.

Pimento Mac & Cheese from Southern Living
  • 8 oz penne pasta (or any small pasta)
  • 2 tablespoons flour
  • 1 1/2 cups skim milk
  • 1 cup shredded Sharp Cheddar cheese
  • 1 2oz jar pimentos, drained
  • salt & pepper
  • pinch of paprika
Boil the pasta in salted water according to the package.  Drain and set aside.  In a small bowl, whisk together the flour and 1/4 cup milk.  Stir in the remaining milk until the mixture is smooth. In a large skillet over med-high heat, bring the milk mixture to a boil while whisking.  Reduce the heat to medium-low and simmer, continuing to whisk, for an additional 3-5 minutes.  Add the cheese, pimentos & spices, stirring until the cheese is melted.  Stir in the pasta and cook for another minute, until the pasta is warmed.

Sunday, August 21, 2011

Banana Oatmeal Chocolate Chip Cookies

I can always tell when my mom is stressed.  She's baking.  I happened to inherit the same gene.  My sister, however, did not.  See where I'm going with this?

A few weeks ago I started flipping through my magazine recipe file looking for the weekly menu plan and came across the following recipe.  I had one banana that was threatening to die on the counter and we were planning a grocery store trip that afternoon, so I could pick up everything else I needed.

The cookies remind me of banana bread...with chocolate chips.  They have a bit of a crunch around the edge, but stay very chewy in the middle.  Cooper loved them - he's not been big on sweet stuff so far, but I think these are perfect since the banana makes up part of the sugar and they aren't overly sweet. 

Banana Oatmeal Chocolate Chip Cookies from Cooking Light
  • 1/2 cup mashed banana (about 1 medium size banana)
  • 1/2 cup packed brown sugar
  • 1/4 cup butter, softened
  • 1/4 cup granulated sugar
  • 1 t vanilla extract
  • 1 egg
  • 1 1/4 cup flour
  • 2 cups old-fashioned oats
  • 1 t baking soda
  • 1/2 t salt
  • 1/2 cup semi-sweet chocolate chips
Preheat oven to 350.  Combine the first 5 ingredients in a large bowl and mix with an electric mixer.  Add in the egg and beat well.  Whisk together the flour, oats, baking soda and salt in a medium bowl.  Add the flour mixture to the wet ingredients, mix until well blended.  Stir in the chocolate chips.

Drop by heaping tablespoonfuls on to greased cookie sheets.  Bake for about 15-18 minutes, until they begin to brown on the edges.  Cool slightly on the pans and move to cooling racks to cool completely.

Wednesday, August 10, 2011

Chipotle Sloppy Joes

Some days I think God created toddler attitudes so that he could point and laugh.  Monday was a perfect example in my house.  We decided to make Sloppy Joes Monday night, using a recipe I'd found in a Cooking Light magazine.  I wasn't sure if they would be spicy, but after tasting them I just noticed a mild smokey flavor - no spice at all.  Meaning, Cooper would be fine.  He eats Sloppy Joes at school on a regular basis, and we were serving sweet potato fries & green peas as well.

I sat his plate on his tray, handed him the fork and said "try it."  And he gives me this smug look, shakes his head and said "no."  NO?  Again, "try it, baby."  And again, smug look, head shake, "no."  Monday, I wanted to scream.  Today, I'm thinking this was entertainment for the evening.  It is hard to explain how frustrated I was without seeing the look, but holy cow that look was just...smug.  That's the best word to describe it.  And the "no" was very short and woman-you-are-not-getting-me-to-eat-that.  In the end, he ate ketchup and some peas.  I'm still not sure who won this battle.

I think this may have been the first time we made Sloppy Joes from scratch.  I will definately hang on to this recipe and use it again.  I just won't count on Cooper having any.  I also think I'll add the bell pepper earlier to sautee it a little more, since I'm not a huge fan of it.  Oh, and I've aquired a serious addiction to caramelized onions.  Thin sliced, sauteed, almost burnt.  Coming from someone who previously hated onions in any form, this is big.

Chipotle Sloppy Joes adapted from Cooking Light

  • 1/2 yellow onion, sliced thin
  • 2 chipotle peppers plus 1 t sauce from 1 7oz can of chipotle peppers in adobo sauce
  • 1 lb ground beef
  • 1/2 bell pepper, diced
  • 2 T tomato paste
  • salt & pepper
  • 1/2 t ground cumin
  • 1 8oz can tomato sauce
Heat 1 t olive oil in a small sautee pan.  Add onions and cook until golden brown, set aside.  Chop the chipotle peppers and set aside.

Heat a large skillet over medium-high heat and coat with cooking spray or olive oil.  Brown the ground beef, and add in the bell pepper, sauteing for an additional two minutes.  Stir in the chipotle peppers, adobo sauce, tomato paste and remaining ingredients.  Cook for another three to four minutes, serving about 1/2 cup on a toasted bun topped with the sauteed onions.

Saturday, July 23, 2011

Chicken Gyros

A few weeks ago I started my menu plan like I always do.  Asking Jason for his opinion.  95% of the time this gets me the same results.  Spaghetti, something on a sandwich.  Or in a pita bread.  Every.Single.Week.  This particular week, though, I was shocked to hear him say "gyros."  To which I had to (unfortunately) reply A) I don't like lamb and B) we have a freezer full of beef.  So, no.

I filed it away, though, thinking I would maybe try lamb again.  Instead, I came across this recipe for Chicken Gyros and knew it would be a winner.  This also came together pretty quickly, so that meets my weeknight meal requirement!

Greek Chicken Gyros adapted from The Way the Cookie Crumbles
Chicken:
  • 1/4 cup lemon juice
  • 2 T olive oil
  • 2-3 cloves garlic, minced
  • 1 T red wine vinegar
  • 1 t sugar
  • 2 T fat free plain Greek yogurt
  • salt & pepper
  • 1 1/2 lbs chicken tenderloins
Whisk together the lemon juice, oil, garlic, vinegar, sugar, salt & pepper.  Reserve 2 tablespoons, and stir in the yogurt.  Toss the chicken into the mixture, cover and refrigerate for 15 minutes.

Heat the grill to a medium heat and cook the chicken until well browned, tossing the leftover marinade.  Remove from the grill and cover with foil, set aside.

Tzatziki:
  • 1/2 cucumber, unpeeled & shredded
  • 1/2 t kosher salt
  • 7oz fat free plain Greek yogurt
  • 1 T lemon juice
  • 1/2 t white wine vinegar
  • 1 clove garlic, minced
  • pepper
Place the shredded cucumber into a strainer set over a bowl.  Sprinkle with salt and set aside for 15 to 20 minutes to drain.  Place the cucumber into a towel and squeeze dry.  In a medium bowl, combine the cucumber & remaining ingredients.

For the topping, thinly slice 1/2 of an onion (yellow or red).  Toss with the 2 tablespoons of marinade and set aside to marinate for 10-15 minutes before serving.  For additional toppings, slice the remaining half of the cucumber, quarter 1 cup grape tomatoes, and crumble Feta cheese.  Serve the chicken, tzatziki & toppings with warm pita bread.

Wednesday, July 13, 2011

Baked Chicken Chimichangas

A few weeks ago I saw this recipe pop up on the weekly menu post on a message board I frequent.  I clicked over to the recipe and couldn't figure out why I missed it the first time it was posted!  I knew we would love this and it met all of my "weeknight" requirements.  I filed it away knowing it would come up on our rotation soon.  Sure enough, a short work week following vacation was the perfect time.

I used my lazy crockpot recipe for the chicken filling, since I wanted to have extra chicken for lunches and even used some on a Mexican pizza one night.  But the chicken isn't what makes this dish.  It is the sauce.  The sauce...was just fantastic.  I used light sour cream, so I didn't feel quite as bad about wanting to lick the spoon.  Fortunately, half of the sauce went into the freezer meaning I'll be making these again soon.

Baked Chicken Chimichangas with Creamy Tomatillo Sauce adapted from So Tasty, So Yummy
  • 2 lbs chicken tenders
  • 2 packages taco seasoning
  • 2 cans Ro-Tel
  • burrito size flour tortillas
  • shredded Mexican style cheese (about 1/2 cup per serving needed)
  • 1 28oz can tomatillos, drained
  • 1 cup chicken broth
  • 1 t cumin
  • juice of 1 lime
  • 2 T cliantro, chopped
  • 1/2 jalapeno, seeded & diced
  • 1 clove garlic, minced
  • 1/4 t salt
  • 1/4 t sugar
  • 1 cup light sour cream
In a crockpot, combine the chicken, taco seasoning & Ro-Tel (you may need to add an additional can of water).  Cook for 4 hours on high or 6-8 on low.  Shred the chicken and stir until combined.

Spoon about 1/3 to 1/2 cup of chicken on to each tortilla.  Add 1/2 cup shredded cheese and roll up, burrito style.  Spray a baking sheet with cooking spray, place the burrito on the sheet & spray with cooking spray.  Bake in a 425 degree oven, for about 20 minutes.

In a large Dutch oven, combine the tomatillos, broth, garlic, cliantro, jalapeno, lime juice & spices.  Bring to a boil, reduce heat & simmer for about 20 minutes.  Remove from the heat and use an immersion blender to puree the mixture.  Return to a low heat and stir in the sour cream.

Serve each chimichanga with about 1/3 cup of tomatillo sauce.

Italian Sausage Ravioli

Ever since my first attempt at making pasta I knew I wanted to get my hands on a pasta roller.  Rolling it by hand is hard work!  And it never really got thin enough.  Fortunately, my mom gave me a pasta roller for my birthday and I knew ravioli was on the menu.  Jason requested ravioli with meat in the filling.  I couldn't really find a recipe I loved, but I knew starting with one from Annie's Eats would be the way to go.

I made this recipe a few months ago, minus the mushrooms.  I took a gamble and swapped out the mushrooms for some sweet Italian sausage.  We were really happy with the end result and even more thrilled that we put half in the freezer!  My only issue at this point is trying to figure out a perfect pasta to filling ratio.  I had a little bit of filling left, but solved the problem by mixing it with some penne and baking it for Cooper's dinner.

Italian Sausage Ravioli in a Spinach Cream Sauce adapted from Annie's Eats


Pasta:

  • 4 eggs
  • 2 cups flour
Filling:
  • 1/2 pound Sweet Italian Sausage, removed from casings
  • 3 cloves of garlic, minced
  • 1/3 cup shredded Parmesan cheese
  • 1/3 cup shredded Asiago cheese
  • 1/3 cup shredded mozzarella cheese
  • 3/4 cup part skim ricotta
  • 1 large egg
  • 1 egg yolk
  • 1/4 t dried basil
  • 1/4 t dried oregano
  • 5oz chopped frozen spinach, thawed & drained
Sauce:
  • 1 T unsalted butter
  • 1 T flour
  • 2 cloves garlic, smashed
  • 1 cup half & half
  • 1/2 cup milk
  • 1 cup shredded Parmesan cheese
  • 5oz chopped frozen spinach, thawed & drained
  • salt & pepper
Pour the flour into the bowl of a stand mixer and make a well in the center.  Add the eggs, and mix using the dough hook.  Begin mixing on low, increasing speed until the dough is well blended.  On a floured surface, continue kneading the dough until it is no longer tacky.  Divide the dough into smaller pieces, keeping it covered with a damp cloth.  Roll out the dough with a rolling pin, then run the pieces through the pasta roller until it is barely translucent.  Keep under a damp towel until used.

Cook the Italian sausage over medium high heat, until browned.  Add the garlic and saute until fragrant.  In a large bowl, combine the cheeses & eggs stirring well.  Add in the spices, spinach & sausage, mixing well.

On a floured surface, lay out the pasta one sheet at a time.  Use a pasta stamp or cookie cutter to create indentations to use as a guide.  Spoon a few teaspoons into each space, and place another sheet of pasta on the top.  Stretch the top sheet to completely cover the filling, pressing out the air before sealing.  Cut the ravioli & place on a floured cookie sheet to dry for about 30-60 minutes.

Cook the pasta in boiling salted water for about 3 to 5 minutes, drain well.

In a medium size sauce pan, melt the butter over medium-high heat.  Whisk in the flour until incorporated.  Add the garlic and continue whisking until the mixture reaches a golden-brown color.  Whisk in the cream & milk, reduce heat to medium and continue to cook, stirring occasionally, until it begins to bubble.  Remove from the heat and stir in the cheese & spinach.  Gently toss the pasta with the sauce before serving.

Saturday, July 9, 2011

Beef Fajitas & Grilled Corn Salsa

The three of us are huge fans of corn on the cob.  I get giddy when I start seeing it in the grocery store - especially at the super low price we get around here.  A few weeks ago, though, Bridget brought some "real" corn - fresh and juicy.  As much as I love the corn on the cob from the grocery store, this was night & day different.  I decided to grill the corn and make some salsa to go with fajitas.  Frankly, I could eat fajitas on a weekly basis.  Now that we're in the dead middle of summer, I feel like this recipe will come around again and again at our house.

Beef Fajitas adapted from Southern Living

  • 2 sirloin steaks, removed from the bone & fat trimmed, sliced into thin strips
  • 1/4 cup olive oil
  • zest of one lime
  • 2 1/2 T lime juice
  • 2 T Worchesterchire sauce
  • 1 1/2 t ground cumin
  • salt & pepper
  • 1/2 t dried oregano
  • 2 garlic cloves, chopped
  • 1 14oz can beef broth
  • 1 handful of cilantro, rough chopped
  • 1 jalapeno, seeded and rough chopped
  • onion, sliced
  • bell pepper, sliced
In a large zip-lock bag, mix the olive oil and next 10 ingredients (through the jalapeno).  Add the steak and marinate for 4 hours, or overnight, in the refrigerator.  Turn the bag occasionally.

Grill the fajitas, onions & bell peppers over a medium-high heat.  Serve with corn or flour tortillas, grilled corn salsa & sour cream.

Grilled Corn Salsa
  • 5-6 ears of corn, shucked
  • 3-4 large tomatoes, seeded & diced
  • 1/2 yellow onion, diced
  • 1-2 jalapenos, seeded & diced
  • 1 handful of cilantro, chopped
  • juice of 1 lime
  • 2 t olive oil
  • salt & pepper
Grill the corn over medium-high heat for 15 minutes, or until done.  Cut the corn from the cob.  Mix in remaining ingredients & season to taste.

Wednesday, July 6, 2011

Dessert for a Year: Blueberry Cheesecake Ice Cream

I've realized that although Jason is getting to enjoy his Dessert for a Year gift, I'm pushing my hand a little more in the decision making process.  For June he asked for a pie.  That three letter word makes me shudder.  I've just never had a lot of success when I comes to pies, but I'm willing to try.  In July. 

See, our A/C has been having a heck of a time keeping up with the house.  I mean, it is only 103 outside on a good day, so I have no idea what the issue is.  But the bottom line is that there was no way I wanted to turn on the oven and bake a pie when the house is hot enough already.  I convinced him to pick ice cream instead.  ((side note: I think I found the recipe, but he approved.  And I think we may have helped the a/c issue so stay tuned for pie in July))

Jason's parents were in for the weekend to help cut back on my calorie consumption, and everyone approved the ice cream.  Well, except Cooper but he was asleep so I guess that doesn't count...  Either way, this turned out to be a rich & creamy ice cream, but not overpowering.  It didn't quite have the cheesecake flavor I thought it would - I thought it had more of the creamy cheesecake texture.  I think next time I may change the fruit to strawberries, just to try something different.  Plus, the grocery store was completely out of blueberries that day so I went for frozen ones.

Blueberry Cheesecake Ice Cream adapted from Cooking Light
  • 1 cups granulated sugar
  • 3oz 1/3 less fat cream cheese, softened
  • 2 large egg yolks
  • 1 1/2 cups reduced fat milk
  • 1/2 cup half-and-half
  • 1 1/2 cups blueberries, rough chopped
  • 1/8 cup powdered sugar
  • 1/8 cup water
In a medium bowl, combine the first three ingredients and beat with an electric mixer.  In a medium sauce pan, heat the milk & half-and-half to a boil.  Remove from heat and gradually whisk into the cheese mixture.  Return it to the sauce pan and heat to 160, stirring constantly.  Place the pan into and ice-filled bowl and chill completely, stirring occasionally.

In a small sauce pan, combine the blueberries, powdered sugar & water.  Bring to a boil, reduce heat & simmer for about 10 minutes, until the mixture thickens.  Stir the blueberry mixture & milk mixture together and pour into an ice cream freezer.  Freeze according the the directions for the ice cream maker, pour into a freezer-safe bowl and freeze for an hour, or until firm.

Lazy Lasagna

I have a love/hate relationship with Rachael Ray and her recipes.  Most of them look pretty good and so easy (hello, 30 Minutes!) but I usually end up an hour and a half later, without a completed dinner, and a hungry baby helping me curse her name.  They aren't every really 30 Minute Meals.

This one, though, came close.  I'd say 45 minutes...and it might have taken less time had I turned the broiler on high and not low!  It was another magazine tear out and turned out to be a keeper.  I usually shy away from anything that calls for a bechamel sauce because I have a hard time getting it thick enough.  Or really, I'm not sure how think it should be...so I think I end up overcooking it.  This time I used skim milk and I'm pretty sure that was a bad idea.  The sauce was very thin and I ended up only using half of it, but the end result was still a winner!

I'm pretty sure this will be our new go-to lasagna recipe.

Lazy Lasagna adapted from Rachael Ray
  • 1 lb whole wheat lasagna noodles, broken into pieces
  • 1 lb ground beef
  • 1/2 onion, diced small
  • 1-2 yellow squash, diced into small pieces
  • 3-4 Roma tomatoes, diced
  • 2 garlic cloves, minced
  • 1 sprig rosemary, chopped fine
  • ground cloves, to taste
  • 1/4 cup tomato paste
  • 2 cups beef stock (note: you can sub in 1 cup white wine...but I didn't want to give mine up)
  • 3 T unsalted butter
  • 2 rounded T flour
  • 2 cups milk (I suggest using whole since my sauce never really thickened the way it should)
  • nutmeg, to taste
  • shredded mozzarella & parmesan cheese
In a large pot, bring salted water to a boil and cook the pasta to al dente.  Drain and set aside.  In a large Dutch Oven, heat 1-2 T of olive oil.  Brown the ground beef & add the onion, veggies, rosemary, garlic, cloves & salt and pepper.  Cook until tender, about 7 to 10 minutes.  Stir in the tomato paste and continue to cook for another minute.  Add in the broth and simmer for 2 to 3 minutes longer. 

In a small sauce pan, melt the butter over medium-high heat.  Whisk in the flour and then milk, stirring constantly until the mixture thickens and coats the back of a spoon.  Remove from the heat and season with nutmeg, salt & pepper.

Stir the cooked pasta with the beef mixture and pour into a greased 9*13 dish.  Pour the bechamel sauce over the top and sprinkle with the cheeses.  Broil in the oven until the cheeses have melted and browned.

Sunday, June 26, 2011

Chili Rubbed Pork

We've been trying to get creative on not eating so much red meat since the freezer is stuffed full of it.  For some reason I've been leaning toward pork recently over chicken.  I consulted my favorite recipe site and came across a good pork kebab recipe that paired with a pineapple salsa - ideal since pineapples have been on sale quite often.  Plus, it gave me a chance to try out my new fire wire.  These things are awesome - they hold a ton of food and are very easy to use.

This recipe is quite simple, but still had a lot of flavor.  We chopped the pork the second night and had tacos for something different.  I'm still running through bags of rice pilaf left from my sisters wedding, so it ended up being an easy meal

Chili Rubbed Pork Kebabs from Real Simple
  • 2-3 lbs of pork - I used a pork tenderloin roast, cubed
  • 3 T chili powder
  • 1 T olive oil
  • onion, bell pepper & pineapple

Heat a grill to medium-high heat.  Cut onions, bell pepper & pineapple into pieces about the size of the pork.  Toss the pork in with the olive oil & chili powder, coating completely.  Thread the pork & vegetables onto skewers and grill for about 15 minutes, turning the skewers a few times during the cooking.

Serve with a pineapple salsa (or any salsa).

Sunday, June 12, 2011

Dessert for a Year: Strawberry Shortcake

I fully intended on making this in May.  I found a recipe, bought the ingredients...and decided to just hang out and relax on Memorial Day instead of spending time in the kitchen. 

Last weekend I grabbed more strawberries (they don't last long with Cooper in the house) and threw these together.  I could easily make this recipe week after week.  The cakes were the perfect texture, with just the right amount of sweetness.  I did cheat and grab a container of Cool Whip, but let's be honest.  There isn't much about Cool Whip I don't like.  And Jason thinks it is awesome, so we were all happy.

Strawberry Shortcakes
  • 4 cups strawberries, hulled and sliced
  • 4 T sugar
  • 1 1/2 cups flour
  • 1 1/2 t baking powder
  • 4 T sugar
  • 1/3 cup cold unsalted butter, diced into small pieces
  • 1/2 cup cold skim milk
  • 1/2 t vanilla extract
  • Cool Whip (or real whipped cream)
Preheat the oven to 425.  In a small bowl, stir together strawberries and sugar, set aside.  In a medium bowl, mix together the flour, baking powder and sugar.  Cut in the butter until it resembles coarse crumbles.  Pour in the milk and vanilla and stir until just mixed.

Drop the mixture in 4 equal spoonfuls on to an ungreased baking sheet.  Bake for about 12-15 minutes, or until done.  Remove from the oven and let cool slightly before slicing.  Place a spoonful of the strawberry mixture on the bottom half of the biscuit, a portion of the whipped cream and the top of the biscuit.  Serve slightly warm.

Source: Pinch My Salt

Friday, June 3, 2011

Edamame Salad

I've mentioned a few times about buying a cow.  Here's the (short) story.  A few months ago I started talking to Cindy about her garden, farmer's markets and buying meat in bulk.  I did a little research (aka Ask Mom) and got a price quote from the meat market my family used to own.  It really just made sense, although we were not quite sure how much meat we'd end up with.  We included Rachel & her family in on a portion, so I placed the order.  The day after Lindsey's wedding, we headed to the meat market thinking we were going to get about 300lbs of beef.

Instead, we loaded up 461lbs.  To say I had a panic attack would be putting it mildly.  Thankfully, my super awesome friend Rachel & her parents took a slightly larger portion and we now all have freezers full of beef.

The largest portion of the beef came ground, but we did manage to get a good stack of tenderized round steak.  I'm saving a few packages for Chicken Fried Steak, but I needed to look for something just a little healthier.  Rachel actually came across this recipe, so I added it to the menu for the week.  We both liked it, although Jason admitted that it is a lot of edamame.


Edamame Salad adapted from Cooking Light
  • 3 cups shelled edamame
  • 2 T low-sodium soy sauce
  • 1 T grated peeled ginger
  • 1 T light mayonnaise
  • 1 T Dijon mustard
  • 2 t white wine vinegar
  • 1 t dark sesame oil
  • 1 pint grape tomatoes, halved
  • 1 cucumber, peeled and chopped
  • 1/4 cup chopped green onion
  • 1 T olive oil
  • about 8-10oz tenderized round steak, cut into 1" pieces
  • salt & pepper
Steam the edamame according to the package.  Rinse with cold water, set aside.

In a large bowl, combine the soy sauce with the next 5 ingredients, and whisk until combined.  Add the edamame, tomatoes, cucumber & onion, tossing to coat.

In a medium skillet, heat the olive oil over high heat.  Season the steak with salt & pepper and add to the pan.  Cook until crisps, about 5-7 minutes.

Just to note, Wednesday kicked off hurricane season.  Yeah.  I've got 150lbs of beef in my freezer.  Usually hurricane season wouldn't be more than a blip on my radar, but if something comes our way this year, I'm loading up my beef and heading to Camp Nana.  To grille. And eat.

Crispy Chicken Taquitos

This recipe has been floating around the cooking board I frequent for a while, so we finally tried it out.  I was in love.  It really is a great recipe to keep on hand for nights we want something that tastes like it should be bad for you, but isn't.  And it can be manipulated a dozen ways!  I've got a laundry list of ideas...I should probably buy a few more packages of corn tortillas!

I adjusted the recipe to make it low fat, but since they are baked you're well off to begin with.  Jason & I were both pleased that they did get pretty crispy without the greasy fried taste.

Crispy Chicken Taquitos adapted from Pink Parsley
  • 3oz fat free cream cheese
  • 1/3 cup salsa verde
  • juice of 1/2 lime
  • 1 t chile powder
  • 1/2 t ground cumin
  • pinch cayenne pepper
  • 3 garlic cloves, minced
  • 1/4 cup chopped fresh cilantro
  • 3 T fine chopped onion
  • 2 cups cooked chicken, shredded (I used a rotisserie chicken to make things easier)
  • 1/2 cup 2% shredded cheddar cheese
  • 1/2 cup 2% shredded Mexican Blend cheese
  • 12 6" corn tortillas
  • salt & pepper
  • cooking spray
Preheat the oven to 425 and spray a baking dish with cooking spray.

In a large mixing bowl, combine the cream cheese, salsa, lime juice & spices.  Mix well and stir in chicken & shredded cheeses.  Add additional salt & pepper if needed.

Warm the tortillas, a few at a time, in the microwave for about 30 seconds.  Spoon 2-3 tablespoons into each tortilla and roll tightly.  Place seam side-down on the baking sheet.  Spray each taquito with cooking spray, add a small sprinkle of salt & bake until they are crisp and golden-brown, about 15-20 minutes.

Weight Watchers PointsPlus: 3 points each, however when I added a serving of 3 it calculated 9 points.  They are very filling and a great low-point dinner if you add fat free sour cream.

Monday, May 30, 2011

Beef Stroganoff

A few weeks ago we did an inventory of the freezer to get a handle on what was in there.  A small stack of tenderized round steaks led me to start thinking outside of the "chicken fried steak" box.  Because, guess what, that's not on my diet.  A quick dig through the fridge and online, and I landed on a Weight Watchers recipe for Beef Stroganoff.  Now that I have quite a few more packages of tenderized round steak in the freezer, this will be a good stand by.  Especially since Cooper was a fan and the points value isn't bad for dinner.

Beef Stroganoff adapted from Weight Watchers
  • 1 cup canned beef broth, low sodium
  • 2 T flour
  • 1 t dijon mustard
  • salt & pepper
  • 2 t olive oil
  • 1 small onion, sliced thin
  • 1/4 cup water
  • 2 T light sour cream
  • 2 T fresh parsley, chopped
  • 3/4 pound tenderized round steak, sliced into 1/4" strips
  • 8 oz whole wheat egg noodles
Cook egg noodles according to package.  Drain and set aside.

Whisk together the beef broth, flour and mustard in a large skillet over medium-high heat until blended smooth.  Continue stirring until the mixture begins to boil and thickens, about 2 minutes.  Pour into a small bowl, set aside.

Wipe the skillet clean and heat the olive oil.  Season the steak with salt and pepper and cook over medium-high heat.  Remove from the skillet and add the onion, stirring until translucent - about 5 minutes. Reduce heat to medium-low and return the meat to the skillet.  Whisk the broth mixture again and add back to the meat & onion mixture.  Cook until warmed through and remove from heat.  Stir in the sour cream, parsley & noodles.
Note: we're not fans of mushrooms, so I left those out.  If you add them, saute them with the onions.  I'm not sure if it will change the points value.

WeightWatchers PointsPlus: 4 servings, 10 pointsplus

Date Night In: Filet Oscar

I've been reading the Foodie Bride recipes for a while.  I've made a few recipes, realized some aren't for me (hello...I don't eat shrimp) and then I come across those that just scare me.  The ingredients are scary, the directions are scary.  I feel like taking it on would have me way in over my head.  But there is still a part of me that wants to try.  The Filet Oscar is one of those recipes.

I love ordering filet oscar when we go out to eat.  I'm generally a meat & potatoes gal, but I also have a strange love of crab meat.  The sauce is yummy, the crab meat just adds a little something extra, and the crunch of the asparagus rounds it all out.  I've been eyeing this recipe for ages.  But every time I think I might try it, I change my mind.  It just looks like a lot of work for something that could very easily flop considering it involves all sorts of things I've never done before.

Earlier this month, we decided to have our date night in for May.  We're also in the process of cleaning out the freezer since we decided to buy part of a cow, so steaks were the first thing that came to mind.  I've whipped up a good horseradish sauce to go with filet before, but for some reason I kept thinking about the crab meat.  Maybe because Deadliest Catch is back on?

Either way, I went for it.  The end result: totally worth it.  The lesson learned: I'll pay more attention to those posts talking about using all of the dishes in the kitchen and spending more time cleaning up than eating.  Totally true.


Filet Oscar adapted from Confections of a Foodie Bride
  • 2 Alaskan King Crab legs
  • 1/2 lb asparagus tips, blanched
  • 2 beef filet steaks
  • 2-3 T white wine vinegar
  • 2-3 T dry white wine
  • 2 T onion, finely chopped
  • 1/2 T fresh tarragon
  • 2 egg yolks
  • 1/2 stick butter, cut into 4 pieces
  • splash of lemon juice
To steam the crab legs, wrap in a loose foil pouch with a small amount of water.  Place in a 375 degree oven for 10-12 minutes.  Use forks (or small power tools) to remove the crab meat.  Add the crab meat to the asparagus tips, set aside.

Season and grill the steaks to desired temperature.  Jason prefers medium rare, I'm more of a medium person.  Remove from the grill, cover with foil and set aside.

In a small saucepan, bring the vinegar, wine, onion and tarragon to a boil.  Reduce the liquid to about 1-2 tablespoons and press through a fine mesh sieve set over a medium bowl.  Toss the solid pieces and whisk the egg yolks into the vinegar mixture.  Set over a double boiler and heat until the yolks begin to thicken, whisking constantly.  Add in the butter, one piece at a time melting completely before adding in the next piece.  Remove from the heat and add in a splash of lemon juice, salt & pepper.  Gently stir in the crab meat & asparagus. 

Top each steak with about 1/3 to 1/2 cup sauce.  It also helps to add in a nice large glass of Zinfandel.  Brought back personally from the winery.

Tuesday, April 26, 2011

Dessert for a year: Strawberry Sour Cream Ice Cream

I'll admit, I may have had a bit of a hand in picking this recipe.  We were down to the last weekend in April where I'm actually home and Jason wasn't being very decisive with his dessert choice.  I "suggested" ice cream.  Then I may have "suggested" strawberry.  I could eat ice cream daily.  Fortunately, I don't - the cost and the calories would add up just a little. 

The other problem is that Jason and I don't always agree on what kind of ice cream to eat.  I want chocolate.  Or something with chocolate in it.  Jason would rather just have plain vanilla or Cookies & Cream.  A good compromise, though, usually ends up being strawberry.  It is plain enough for him and has just the right amount of something extra for me.  I've made strawberry before using the recipe that came with the ice cream maker.  It's good, but it is more like vanilla flavored with strawberries and this is actually strawberry ice cream.

When I read the recipe, I wasn't sure what to expect in the taste of the ice cream.  I just couldn't grasp it being sour...but I loved it.  It is just a bit sour, but the sweetness of the strawberries is a perfect balance.  The best part, though, was that it stayed soft.  I've had an issue in the past of the ice cream I make getting very hard in the freezer.  I think it could be because of the low-fat ingredients I use.  I also really want to get a copy of The Perfect Scoop, but I'm thinking it may have a few too many recipes for ice cream that I love and not enough that Jason will love.

Strawberry Sour Cream Ice Cream from The Perfect Scoop via the Foodie Bride
  • 1 lb strawberries, hulled & rough chopped
  • 1 T vodka
  • 1/2 cup sugar
  • 1 cup light sour cream
  • 1/2 cup heavy cream
  • 1/2 cup buttermilk
  • 2 T lemon juice
In a large bowl, combine the strawberries, vodka & sugar.  Stir, cover and let set in the fridge for at least an hour.  In a food processor, combine the sour cream, heavy cream, buttermilk & lemon juice and pulse until blended.  Add in the strawberry mixture and pulse until well combined.  Refrigerate for at least another hour.

Freeze according to the ice cream make you are using - mine took about half an hour.

Friday, April 22, 2011

Pink Lemonade Cupcakes


The Pink Lemonade cupcakes were very tart, but I like that.  I would almost have added just a touch more pink lemonade concentrate.

Pink Lemonade Cupcakes from Confections of a Foodie Bride
  • 1 1/8 cup frozen Pink Lemonade Concentrate, thawed
  • 1 box white cake mix
  • 3 egg whites
  • 2 T vegetable oil
  • non-stick spray
Preheat the oven to 350.  In a stand mixer, combine the cake mix, egg whites, oil & pink lemonade concentrate.  Mix on low for about 30 seconds and then increase the speed to medium for another 90 seconds.  (the batter will be lumpy, but do not overmix it)

Spray the paper cupcake liners with non-stick spray and fill the cups about 3/4 full.  Bake for 25 minutes, or until they pass the toothpick test.  Remove from the oven and let them cool for about 5 minutes before removing them from the pan.

Lemon Buttercream Frosting
  • 3 cups plus 3 T powdered sugar
  • 1 stick unsalted butter, at room temp
  • 1/8 t salt
  • 2 T lemon juice
  • pink food coloring
Add the butter, powdered sugar, salt & lemon juice to a stand mixer and mix on low until combined.  Increase the speed to medium and beat until fluffy.  Mix in food coloring until you get the desired shade of pink.

Margarita Cupcakes

A few weeks ago I hosted a couple's shower for my sister and her fiance.  Adam's sister and Lindsey's best friend also helped to host, and although I took photos of only the cupcakes, it turned out to be very nice.  The weather was pretty good, just a little hot, but it stayed cloudy and we were able to sit outside and visit.  I spent some time before the shower making a lot of pulled pork for sandwiches.  We also served potato salad and Chuy's dip.  As it was bound to happen, sometime in the middle of cooking pulled pork my crockpot decided to stop working.  I managed to cook the pork in the oven and we Amazoned another crockpot over.

Last spring, when I was out on maternity leave I happened upon the cutest invitations at Target.  They were in colors of pale pink, orange & green and I just had to buy them.  Even better, the box of 50 was marked down to $5.  I bought two boxes.  The main purpose was for them to be used for a shower for Lindsey, but since I still have quite a few left I'm pretty sure they will surface again.  Hey, they are cute, though!  As soon as I started looking at food for the shower, I just knew I had to make pink and green cupcakes.  Even though Jason told me that I'd be the only one who would notice that they matched the invitation, it didn't matter.  I started thinking and remembered cupcakes from Shawnda's blog that seemed like they would be perfect.  Pink Lemonade & Margarita.  I really should do that baking thing more often, though, since I was a little rusty.  It just doesn't seem to come as natural as it used to!

Just a note, she's got two recipes for Margarita Cupcakes in her blog.  I went with the cupcakes from scratch, but used the icing listed in the recipe for the cupcakes adapted from a boxed mix.  Mostly because I didn't have tequila at home at the time and I didn't want to use so many egg whites.  I really liked both cupcakes, but I loved these.  The cake is very dense, but still remained moist.  The Pink Lemonade ones seemed a little dry, however almost everyone else liked them better.  Go figure.

Margarita Cupcakes from Confections of a Foodie Bride
  • 3 cups flour
  • 1 T baking powder
  • 1/2 t salt
  • 1 cup (2 sticks) unsalted butter, at room temp
  • 2 cups sugar
  • 4 eggs
  • 3 limes, zested and juiced
  • 1/2 t vanilla
  • 1 cup buttermilk
Preheat the oven to 325 and line muffin tins with paper cupcake liners.  Whisk flour, baking powder & salt together and set aside.  In a mixer, cream butter and sugar on high until light and fluffy.  Add the eggs one at a time, mixing well between each egg.  Beat in the lime zest and juice.  Reduce the speed on the mixer to low and slowly add in the dry ingredients and buttermilk, alternating 1/3 of the dry ingredients and 1/2 of the buttermilk at a time.  Mix until just incorporated.

Fill each muffin cup about 3/4 full and bake for 25 mintues, or until the pass the toothpick test, rotate the cupcakes halfway through baking.  Allow them to cool completely before removing them from the pans. 


Lime Buttercream Frosting from Confections of a Foodie Bride
  • 4 cups powdered sugar
  • 1 stick unsalted butter, at room temp
  • 1/8 t salt
  • 3 T lime juice
  • green food coloring
In a stand mixer, combine the butter, powdered sugar, salt & lime juice and mix on low until combined.  Turn the speed to medium-high and mix until the icing is fluffy.  Stir in food coloring to get the desired green color.

Wednesday, April 6, 2011

Recipe Swap: One Pot Pasta

I participated in another recipe swap this week with pasta as the topic.  When I got this recipe, my first thought was "that's probably not healthy."  But then I read the ingredient list again and saw something that sucked me in - sun dried tomatoes.  I love sun dried tomatoes.  I like tomatoes in general, but sun dried ones just have this sweet caramelized flavor that changes the whole dish.

I adapted this recipe just a little to make it healthier and to work with what we had at home.  We all really liked it and decided it is a good way to use up some fresh veggies before they go bad, and the whole thing came together in under half an hour.


Creamy One Pot Pasta adapted from The Cooking Nurse, originally from Pampered Chef
  • 4 cloves garlic, pressed or minced
  • 2 t olive oil
  • 20 oz low sodium chicken broth + 20 oz water
  • 1 box whole wheat linguine
  • 2 medium carrots
  • 2 medium zucchini
  • 1 bag frozen broccoli cuts (I forgot to buy fresh, but that would be better)
  • 1/2 10 oz jar sun dried tomatoes
  • 1 t Italian seasoning
  • salt & pepper
  • 4 oz fat free cream cheese
  • parmesan cheese & red pepper flakes
In a large heavy pot, heat the olive oil and saute the garlic until it is fragrant.  Remove from the heat and add chicken broth & water.  Bring to a boil, add the pasta and cook to al dente.

Peel the carrots & zucchini, cut into bite sized pieces.  If using fresh broccoli, cut the florets as well.  Pat the tomatoes dry and slice, cube the cream cheese.  Once the pasta cooks, add the remaining ingredients, reduce the heat and stir until the vegetables are cooked through.  Serve topped with grated parmesan cheese & red pepper flakes.

Tuesday, April 5, 2011

Dessert for a Year: Peach Cobbler

I was at a loss when it came to Valentine's Day this year.  Jason's birthday is the day before so I try to think of something nice, but not too pricey as a gift for him.  Unfortunately, I just wasn't getting very far until I came up with dessert.

Jason is a fan of dessert.  I'd make it more often, but sometimes the ingredients aren't things we have at home and I've maxed out my grocery budget.  And I don't always need dessert sitting around the house.  But for a special occasion, I'll make an exception.  That's when I decided on "Dessert for a Year."  A fellow blogger did "Pie for a Year" for her husband before, so I sort of borrowed the idea from her.  Jason has been instructed to pick out one dessert for me to make each month.  His first choice: Peach Cobber.  With a pie crust type topping - not a crumble.

If you've never looked for cobbler recipes, they can be a little hard to find.  Most of them tend to have the crumble type topping.  So I scoured my favorite website (Myrecipes.com) to find the right recipe.  I can rely on them for good southern food because the recipes come from several magazine publications, one being Southern Living.  If they don't have a good Peach Cobbler recipe, I don't think it exists.

I decided to bake this last when while home with Cooper.  Last Monday.  Why I thought it would be a good idea to throw together a cobbler with a sick kid underfoot, I still don't know.  What was even worse is that Jason waited to have some with me once I got home Monday night from bunko, but I wasn't feeling well.  Then Tuesday he got sick, so we finally tasted the cobbler Wednesday and took the rest of it to my mom's house this weekend. 

For my first "real" cobbler I am pretty happy with the result.  I did divide the recipe in half, since a full 9*13 dish of cobbler is a lot of dessert for our house.

Pecan-Peach Cobbler adapted from Southern Living
  • 1 16oz bag frozen peaches, thawed
  • 1 1/2 cups sugar
  • 8 T flour
  • 1/4 t nutmeg
  • 3/4 t vanilla extract
  • 1/3 cup butter
  • 1 15oz pkg refrigerated pie crust
  • 1/4 cup chopped pecans
  • 1/8 cup sugar
Combine the first four ingredients in a Dutch oven, let stand for about 10 minutes until the sugar dissolves.  Bring the mixture to a boil, reduce heat and simmer for an additional 10 minutes.  Remove from heat and add in vanilla & butter, stirring until the butter melts.

Unfold the pie crusts.  Sprinkle one half with pecans and sugar, place the other half on top, roll up and slice into 1 1/2" thick strips.

Pour half of the peach mixture into a greased dish.  I used a medium sized oval baking dish, or an 8" square dish would work as well.  Top the peaches with half of the pie crust, worked into a lattice pattern.  Bake at 475 for about 20 minutes.  Top with the remaining peach mixture and pie crusts.  I also added a little extra chopped pecans and sugar for some added crunch.  Bake for an additional 15 minutes, or until the crust is golden brown.

Monday, April 4, 2011

Pork Chops with a Dijon Mustard Sauce

I feel like I fall into a rut when it comes to cooking.  Most of the things we cook on a regular basis are pretty good, but even then I like a little variety.  However, I need it to be easy.  I need most of my food to fall into that week-night quick meal category.  And sometimes that translates to "it's pretty good, but not fantastic."   

But every once in a while I come across something that makes me think about how lady-like it would be to actually lick the plate.  This was one of those recipes...and I didn't even have all of the right ingredients.  Kroger was out of fresh tarragon so I decided to just wing it with dried herbs instead.  I also only had bone-in pork chops that night.  I actually like those because I can be just as un-lady-like while eating them, however they are usually a little thinner than the boneless ones.  I also used this as a good excuse to buy white wine.  We rarely drink white wine around the house.  Jason is just so-so with it and I gravitate toward a good red.  For this I grabbed a bottle of Toad Hollow Chardonnay.  We found their tasting room on our last trip to Sonoma and came home with a few bottles.  They are very reasonably priced ($10-25) and we both enjoyed the Chardonnay.  Although Jason was slightly disappointed to see me pour a serving into the pan for the sauce...

Pork

Dijon Mustard Pork Chops adapted from So Tasty, So Yummy
  • 4 pork chops, boneless or bone-in
  • 1 T olive oil
  • 1/3-1/2 cup white wine
  • 1/2 cup light cream
  • 1/2 cup chicken broth
  • 1 1/2 t dried tarragon
  • 1/2 t dried basil
  • 2 T Dijon mustard
Preheat the oven to 425.  Heat the olive oil in a heavy skillet over medium-high heat.  Season the pork chops with salt & pepper before searing them in the pan.  Cook for about 3 minutes on each side, move to the oven to finish cooking.  Remove the pan from the heat and let it rest for about 5 minutes.

Return the pan to the stove and deglaze it with the wine, simmer for about 2-3 minutes, stirring.  Add the cream, broth, spices & mustard and cook until the sauce is reduced, stirring occasionally for about 10 minutes.  Season with salt & pepper if desired and serve over the pork chops.

I promise not to judge if you cannot control yourself and decide to lick the plate.  This sauce even held up well for leftovers the following night.

Thursday, March 31, 2011

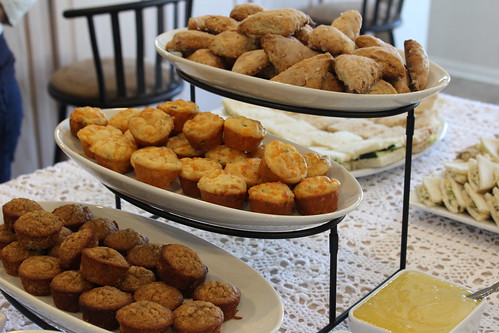
Cheddar & Chive Muffins

There is only one thing that could have made these muffins taste better.  Bacon.  Thing is, I didn't realize that until after they were baked and I was burning my mouth trying to taste one warm, right out of the oven.  Jason and I both agreed that these could (and should) be made again.  Possibly one weekend that Bear & Bridget come to visit...however we also agreed that we would need to double the recipe since Bear would devour at least a dozen just standing in the kitchen.

Cheddar & Chive Muffins adapted from Sugar Crafter
  • 1 1/2 cups flour
  • 1 T sugar
  • 1 T baking powder
  • 1/2 t kosher salt
  • 1 1/2 cups shredded sharp cheddar cheese
  • 3-4 T fresh chives, chopped
  • 1 egg, lightly beaten
  • 1 cup skim milk
  • 2 T unsalted butter, melted
Preheat the oven to 375.  Lightly grease a mini-muffin pan.  In a large bowl, whisk together the dry ingredients.  Stir in the grated cheese & chives.  See, this is where you could add cooked, crumbled bacon!  In another bowl, combine the milk, egg & butter.  Add to the dry ingredients and stir just until everything is moist.  Spoon into the mini-muffin pan and bake about 15-20 minutes, or until golden on top.

I got 36 of the mini-muffins from one batch.  If you don't have two pans, or you don't want to wait on the first batch to bake, and then bake again you can always add a little more batter to each and get an even two dozen.

IMG_5709

WW PointsPlus: 1 pt per muffin for a batch of 36

Friday, March 25, 2011

Recipe Exchange: Bubble & Squeak

This week I participated in a recipe exchange on a cooking board I frequent.  The topic happened to be "Quick Weeknight Meals" asking for recipes that can be cooked in under an hour.

Score!

When you combine our work schedules and drive time, if dinner can't be on the table in about 45 minutes, we will probably end up ordering pizza.  Jason and I both get home around 6:30, Cooper is starving and it's a mad dash to get things ready.  It's very important to me that we eat as a family.  Some days it doesn't happen.  Cooper will end up throwing all of his food on the floor, or we opt to eat after he goes to bed because we know the meal will take a while.  But most of the time we eat together.  That said, I'm always looking for something that can be thrown together in a matter of minutes. 

When this recipe came across my email my first thought was "What the heck is that?"  Then I read the recipe.  Read it again.  And realized that it was something I knew we'd like!  I'm a meat and potatoes kind of person and we're fond of sauteed cabbage - this meal has it all.

Oh, and apparently Bubble & Squeak is a traditional English dish.  Although I didn't Google it so I can't confirm that.  Either way, I can see us making it again.  I did sub white wine vinegar for the cider vinegar the recipe called for, only because that's what I had at home.

Bubble & Squeak from Some Dreams Come True
  • 1 link smoked pork sausage, sliced
  • olive oil
  • 1/2 onion, chopped
  • 2-3 large potatoes, diced fairly small
  • 1 head of cabbage, shredded
  • salt & pepper
  • 1/4 cup white wine vinegar
In a large Dutch oven, heat olive oil over medium heat.  Add in the sliced sausage and cook until browned.  Toss in the potatoes & onions, season with salt & pepper.  Cover with the lid, stirring occasionally.  Once the potatoes are almost done, add in the cabbage and cook covered until the cabbage wilts down.  Remove from the heat, pour in the vinegar, stir and serve.

We served this with cornbread pancakes.  I'm usually follow the recipe on the back of the bag and then cook them on the stove top just like pancakes.  And because I'm especially strange, I like the spread a little Miracle Whip on these.  Only the pancakes, not regular cornbread.  That gets butter.  But the pancakes...yum.  And Cooper takes after his mom because he ate all of the Miracle Whip before he ate the cornbread.